Repost from our forum thread here.
The EM approach to Astigmatism
1. What is astigmatism?
The word astigmatism comes from Greek. It means having no point. When we use it for eyesight, it means that the light coming into our eyes does not hit the retina at one point. This means that we do not get a clear image. It is different to myopia, where we do not get a clear image either. But in myopia it is because the light can only come to a point in front of the retina. The reason why the light cannot come to one point in astigmatism is because the cornea does not have a regular shape. It can also be because the lens does not have a regular shape. It is more difficult to measure the shape of the lens than the shape of the cornea.
Images and diagrams can explain astigmatism much more easily than words alone. These videos will explain a lot to you.
Astigmatism Explained – YouTube 26
Sphere, Astigmatism, Axis and The Eyeglasses Prescription – YouTube 7
This diagram may also help

To benefit from the EM method, you do not need to know what kind of astigmatism you have. But if you are interested, you will find some short descriptions in the appendix.
2. Understanding your prescription
Your optometrist will tell you if you have astigmatism. You can also tell by looking at your prescription. If this is the first time you have seen a cylinder correction on your prescription, it may be a false alarm. Even optometrists have difficulty measuring astigmatism, especially if it is as low as 0.25 or even 0.50. If you do not have a cylinder correction in the glasses you have been using up to now, it is better not to add it to your new glasses.
Look at this prescription for glasses with cylinder correction. You will find another example in the video at the beginning of the guide.

a. Cylinder diopter . This shows the difference between the diopters of correction for the strong and weak axes of the eyes. You can try to measure this yourself, as shown in point 4.b.
b. Cylinder axis. This shows, in degrees, the angle at which the cornea is irregular. You can measure your axis of astigmatism quite easily yourself, as shown in point 4.a.
c. Cylinder notation . The sign in front of the cylinder diopter is important. A plus sign means something different to a minus sign. A minus sign means that the weaker axis of your eye has moremyopia that the stronger axis, and the diopter tells you by how much more. The number given under axis will tell the lens grinder at which angle to give the extra correction.
Sometimes there is a plus sign before the cylinder diopter. This means that the spherical diopter given is that for the weaker axis, and the cylinder diopter shows how much less correction you need for the stronger axis. This also means that the axis given after the cylinder diopter is for the stronger axis, and not the weaker one. For example: -8 spherical and +2 cylinder is the same as -6 spherical and -2 cylinder BUT the axis changes.
A lens grinder will always convert a plus notation to a minus notation when grinding the lens.
Conversion from + to – notation
You probably have your cylinder diopters marked with the minus notation, and this is what most people on the forum give. If you have it in the plus notation, it helps to convert it to the minus notation. You need to do this anyway when ordering glasses online. You can do the conversion yourself, as explained here .What Is Flat Transposition And How Is It Done? – YouTube 5
It is very clear, and gives some worked examples.
You can also use an online converter, as here Positive CYL Converter 11
3. Causes of astigmatism
a. unknown/inborn
This could be a genetic predisposition to astigmatism. It could be the result of uneven growth in different parts of the eye. This could explain why some people start with only the need for astigmatism correction and not myopia or hyperopia.
b. lens-induced. This can happen when the optometrist starts correcting for only a small amount of astigmatism instead of ignoring it. When the eye gets used to the correction, it can no longer do without it. This then becomes worse when the cylinder correction gets stronger and stronger over time.
c. vision habit induced. This can happen for different reasons. It can be uneven use of the eyes, like reading lying sideways in bed. It can happen if you share a music-stand with someone, always on the same side of the stand. It can happen if you have to share a textbook in the classroom. It can also be caused by uneven lighting during long hours of close vision, especially at the screen. The light may be stronger from one side than the other, or from above only. This can then be made worse by increasingly stronger cylinder correction. You can read more about this in Elliot Forrest’s papers on astigmatism:
NewModelFunctionalAstigmatism-Forrest.pdf 9 (1.2 MB)
EyeScanTherapyAstigmatism-Forrest.pdf 9 (1.1 MB)
Whatever the cause, unless it is a serious physical defect of the eye, the EM method can help to reduce astigmatism. We do not really know how it works, but we know that it works for many people.
4. Measuring your own astigmatism
For many people astigmatism can change during the course of a day, or a week, and even the course of your life. You saw in the video how astigmatism is measured with complicated machines. But if the measurements are repeated at another time, you could get different results. This also makes it difficult to measure your own astigmatism, but it is worth learning how do so. At first you may not be very accurate. It takes time to learn to see exactly where deformation or blurring starts.
a. Axis of astigmatism. This is the easiest to measure and can be done on diagrams like this.

If you use a fan like this to measure your axis, you need to do some conversion to find the axis of your cylinder correction. Many astigmatism wheels have done the conversion for you, and they look like this. The astigmatism wheel on the EM website also looks like this.

To find your cylinder axis for each eye close one eye. Stand at a distance where all the lines of the fan are equally dark. Then increase the distance until some lines start to blur or to become fainter. There should be some lines that remain dark and clear. Take the darkest line, or something halfway between the two darkest lines. This is your axis of astigmatism for that eye. You can check this with the axis shown on your prescription.
b. Diopters of astigmatism. This is more difficult to measure yourself. You can use the astigmatism wheel given on the website. DIY TOOLS: How To Measure Your Astigmatism Diopters – Endmyopia® 31 It is rather small and not very clear, so it will not be useful for measuring astigmatism with low myopia.
Measuring with cm to blur
If you can clearly see where letters start to deform or to make ‘ghosts’ you do not need the wheel to measure diopters of cylinder. Note the cm distance at which the astigmatic deformation or ghosting begins. Turn this into diopters using the converter on the website. Then move the text further away until there is overall blurring. Measure this and turn it into diopters. Subtract the lower number from the higher number. The result is your cylinder diopter. Example: I see the first sign of ghosting or deformation at 20cm. This is -5 (my weaker axis). I start seeing overall blur at 25 cm. This is -4 (my stronger axis). The smaller number subtracted from the bigger number is -1. So my cylinder dioptre is -1 and my spherical diopter is -4. Check with your prescription to see if you got it right.
Measuring with a trial lens kit
If you have a trial lens kit you can measure your astigmatism more accurately. More information on this is given in the appendix.
Irregular astigmatism. You cannot measure this yourself. It is also hard to correct. The optometrist can measure all the irregularities of your cornea with special machines, but can only prescribe the cylinder correction on one axis. So if you cannot measure your own astigmatism accurately and consistently, this may be the reason. You will find a short video on irregular astigmatism in the Appendix.
5. Diopters, diopter gap and diopter ratio
a. Diopters. We measure both myopia and astigmatism in diopters. In both, we talk about low, medium and high diopters. The range of diopters in myopia is very big, from -0.25 to as high as -20D or more. In astigmatism, the range is smaller, from -0.25 to about -6D. How you tackle your reductions depends on a few things.
b. Diopter gap is the difference in diopters between your eyes. If you have the same in both eyes, there is no diopter gap. The diopter gap between eyes can be quite high, especially in sphere. The diopter gap can be as low as 0.25 and a lot higher. The higher the diopter gap, both in sphere and cylinder, the more complicated your reduction steps will be.
c. Diopter ratio is not the same as diopter gap. If your eyes are the same, you have a diopter ratio of 1:1. If your eyes are not the same, the diopter ratio could be, for example, 2:1 or 3:1. You can also show your diopter ratio between sphere and cylinder. So your ratio of sphere to cylinder could be 4:1. In rare situations, it could be 1:1 or even 0.5: 1. There is some confusion between keeping diopter gaps the same and keeping diopter ratios the same. Because reductions come in 0.25D steps, it is impossible to keep the diopter ratio the same unless it is 1:1
6. Spherical equivalent (SE)
This is a way of ‘converting’ the cylinder diopter to a spherical diopter. It is a compromise between the stronger and the weaker axes of the eye. Divide the cylinder diopters by 2, and add this to the spherical diopters. This puts the cylinder diopter at 0. The stronger axis is over-corrected and the weaker axis is under-corrected. Here is an example: You have -4 sphere and -1 cylinder. Take half of the cylinder and add it to the sphere. Your spherical equivalent is -4.5.
Spherical equivalent can be useful if you have low astigmatism. This gets rid of a complication in your lenses, and in your lens reduction plan. It is not going to work too well with high cylinder.
7. The Steps – reduction strategies
We cannot tell you the ‘correct’ steps for your situation. We can only give guidelines
Severity of myopia is usually given as: up to 3 = low; 3-6 = moderate; 6 and up = high
Severity of astigmatism is usually given as: less than 1 = low; 1-2 = moderate; 2-4 = high; 4 and up = very high
a. medium to high myopia and low astigmatism and no diopter gaps in cylinder. Your path is fairly clear.
Diffs You could leave out cylinder correction in your diffs.
Norms You should start with two spherical reductions and then do a cylinder reduction. Carry on alternating like this until all cylinder correction is gone. Some people try combining a spherical and a cylinder reduction, but this does not always work out.
b. low myopia and low astigmatism, and no diopter gap in cylinder.
Diffs You may not need diffs, but if you do, you will not need cylinder in your diffs.
Norms Do not wait too long before reducing cylinder. Here you can make first only one spherical reduction and then a cylinder one, and carry on alternating until all cylinder is gone
c. low myopia and medium to high cylinder, but no diopter gap in cylinder.
Diffs You may need to keep some cylinder in your diffs.
Norms You may need to start with a cylinder reduction instead of spherical reductions, and then alternate. You may find that you spherical dioptre become 0 while you still need some cylinder. Then work on reducing the rest of the cylinder
d. You have a diopter gap in cylinder. At one stage you will have to equalise this by reducing cylinder in only the more astigmatic eye. This is the same procedure as for equalising spherical corrections. This is a bit trickier and less predictable. Apart from that, choosing diffs and norms remains the same as for your general situation
e. You have a diopter gap in spherical and cylinder. This makes things doubly complicated, especially if the diopter gaps are big. You will have to juggle with 4 things – spherical reduction and equalising, and cylinder reduction and equalising. You may want to buy a test lens kit to try out all the possibilities. This is expensive, but could save you some pairs of useless glasses because you got it wrong. Choosing diffs and norms again depends on your general situation.
8. Troubleshooting and tips
A tip from @ajbennett – many people with astigmatism have their axes at roughly 90 degrees from each other which means that when both eyes are open your brain is able to interpret more / see better. What this means for the journey is you need to do a lot of ONE EYE at a time work (active focus, blur clearing, etc) if you have this kind of astigmatism, especially as you get down in diopters. You can’t improve as much if your eyes are correcting for each other all the time
Tips from @Salt
What makes astigmatism worse? (that is, what specific set of bad habits can cause the eye to worsen at the level of one axis instead of uniformly becoming more myopic. The point is to become aware of possible lifestyle habits that are impeding improvement.)
- Wearing cylinder correction on the wrong axis or beyond one’s needs.
- Looking for extended periods of time at a target that is not in the centre of vision. (example: computer screen is on the side instead of right in front of the user, reading or using the phone while lying sideways, etc.)
- Habits of looking in a certain direction by moving the eyes without moving the head.
When is a cylinder reduction considered successful?
If you see well in good lighting, it might not be enough. I am not sure if it is a form of (clinical) blur adaptation or if light just hides the weirdest aberrations, but be sure to check your vision at night.
- Are the moon, neon lights and digital clocks in darkness free of all distortion and/or ghosting in your normalised?
- Same point as the above, but in your next normalised. That is, did the increased spherical challenge reveal residual cylindrical challenge?
If so, it seems reasonable to me to consider the astigmatism gone. An optometrist’s confirmation is not necessary, but desirable.
I’ve been at it for months and it does not seem to go away, what to do?
- The challenge might be too big. Consider going up by introducing back some cylinder or by adding a little bit of spherical correction.
- You might not be getting enough stimulus. If there is not enough challenge during the day, try to use more regularly neon lights (or the moon) at night for active focus.
- If you have a fair amount of myopia left, consider maybe rescheduling your cylinder reduction and add in a few successful spherical reductions before the next attempt.
APPENDIX
The Five Different Types of Astigmatism
With all types of astigmatism light rays come together to form not one but two focal points. This creates vision problems. As you saw in the video, astigmatism can cause distortion, or smearing of vision, and it can also cause ghost images.
First Type. Simple Myopic Astigmatism, where light comes to two focal points: one before the retina, and one on the retina.
Second Type. Simple Hyperopic Astigmatism, where light comes to two focal points: one on the retina and another focus point that would be a virtual point behind the retina.
Third Type. Compound Myopic Astigmatism where light comes to two focal points, both of which are before the retina but at two different locations before the retina.
Fourth Type. Compound Hyperopic Astigmatism where light comes to focal points both of which would be in a virtual location behind the retina but at different virtual locations behind the retina.
Fifth Type. Mixed Astigmatism where light rays come to two focal points, one of which is before the retina and the other of which is behind the retina

This video gives more explanation. Common Refractive Errors Of The Human Eye – YouTube 3
Irregular astigmatism is when the eye curves more in any direction, not just the center. The curve could be steeper towards the bottom than on top, or it could be any way in which the eye’s surface area is uneven.
Regular astigmatism vs irregular astigmatism, corneal curvature – A State of Sight #57 5
Against the rule (ATR) and with the rule (WTR) astigmatism
If we view the eye as a sphere, “against-the-rule” is astigmatism where the steepest curve lies near the 180-degree meridian (imaginary line connecting east and west points of the cornea), and “with-the-rule” astigmatism (line connecting north and south points) where the steepest curve lies near the 90-degree meridian.
Oblique astigmatism occurs when the steepest curve of the cornea isn’t in the vertical or horizontal meridians. It is rather in an oblique meridian between 120 and 150 degrees and 30 and 60 degrees.
Parallel or Mirror Image astigmatism .
Parallel astigmatism is a term used when the astigmatism in both eyes is more or less parallel in axis. Mirror image astigmatism is the term used when the axes of astigmatism in the eyes are the mirror image of each other.
Measuring astigmatism using a trial lens set. contributed by @Merlin93
This assumes you have already refined your maximum spherical acuity and now you are looking to refine your cylinder acuity.
Definitions:
- JCC refers to Jackson Cross Cylinder lens. This is a lens with plus power in one meridian and minus power in the other (90° offset). Two of these are included with most trial lens sets, but they can also be purchased without a trial lens set and often come in a set of 2 or 4 (0.25, 0.50, 0.75, and 1.00 diopters). A 0.50 diopter JCC lens is what I describe below and should be perfect for most people, but those with very high cylinder power (or low vision) may need to use a 1.00 diopter JCC lens instead.
- SS refers to a Stenopaeic Slit plate, which is a plastic plate with a 1mm, 1.5mm, or 2mm slit covering 2/3rds of the width of the plate. It uses the same principle as a pinhole occluder to block light so it only enters from one meridian at a time.
Refining Cylinder
If the cylinder power from your last prescription (or known good measurement) is less than -1.00D, refine the power first; otherwise, refine the axis first. Keep in mind that if the starting cylinder is ≤ ±0.50D (some suggest ≤ ±0.75D) it may not be real astigmatism at all.
When doing astigmatism checks, it is often better to use a dot field rather than a line of text to measure visual acuity. If a dot field is not available, use the letter D on an eye chart. When flipping lenses look for which side of the lens makes the image look more like a “D” and less like an “O”.
Axis Check (using JCC 0.50 lens)
- Line the JCC up so that the red and white dots (lines) are on either side of the starting cylinder axis (at 45°).
- Identify your visual acuity target (i.e., a single line of letters or just the letter “D” one line larger than best visual acuity or a dot field).
- Twist the wand to flip the JCC from one side to the other for options 1 and 2. Look for better, not necessarily clear.
- If the two lenses are equal, the starting axis is fine, move on to power determination
- If not, rotate the cylinder axis toward the minus axis (red dot or line) of the JCC and repeat
- For ≤ 2.00D of cylinder, initially move in 15° increments. You will decrease the increment size following a reversal by 15-10-5-3-1° as the axis is refined.
- For > 2.00D of cylinder, initially use 5° increments. Decrease increment size following reversal by 5-3-1°.
- If the repeat gives the opposite, then move the axis back by the next increment given above.
- If the repeat gives the same direction as last, then change axis toward red again
- Continue with bracketing until no difference is found between lens positions
Power Refinement (using JCC 0.50 lens)
- Align the dots (or lines) of the JCC with the given cylinder axis
- Twist the wand to flip the JCC from one side to the other for options 1 and 2. Look for better, not necessarily clear.
- If the two lenses are equal, you’re done
- If the red dots (lines) are better, add -0.25 cyl; otherwise remove -0.25 cyl
- For every -0.50D of added cyl make sure to add +0.25D of sphere to maintain the spherical equivalent.
- Repeat the test again until no difference is found between lens positions
Alternative: Find Axis & Power Using a Stenopaeic Slit
Note: This doesn’t work well for people with low levels of astigmatism. You’re better off using a JCC lens in those cases.
- Starting with the best spherical acuity, add +0.50D SPH to fog vision a bit. This should drop about 2 lines of acuity on the eye chart. If not, remove the +0.50 and add +1.00 SPH instead.
- Add a SS plate to the trial frame. Rotate while looking at your acuity target until the best visual acuity is achieved
- The slit should now be aligned with the minus cylinder axis
- Refine the two principle meridians separately with the SS in place
- First (minus) meridian should be with the slit along the minus axis as it is to begin
- Second (plus) meridian should be with the slit rotated 90° from the minus axis
- The difference in power between the two meridian refractions is the cylinder power
- Repeat from step 1 using the other eye.
Refining SS meridian using Maximum Plus to Maximum Visual Acuity (MPMVA) technique
- The eye should already be slightly fogged from step 1 above.
- Slowly reduce plus power in 0.25D steps (aka add minus) until there is no further improvement in visual acuity. But don’t go lower than 20/20 unless there is a good reason to do so. If the text gets darker and smaller, you’ve gone too far… add back +0.25 SPH.
Notes:
- If the final change in cylinder power is more than -0.75D, refine the axis again
- Always maintain spherical equivalence
- For every -0.50D increase in CYL, add +0.25D SPH (aka remove -0.25 SPH)
- For every -0.50D decrease in CYL, remove +0.25D SPH (aka add -0.25 SPH)
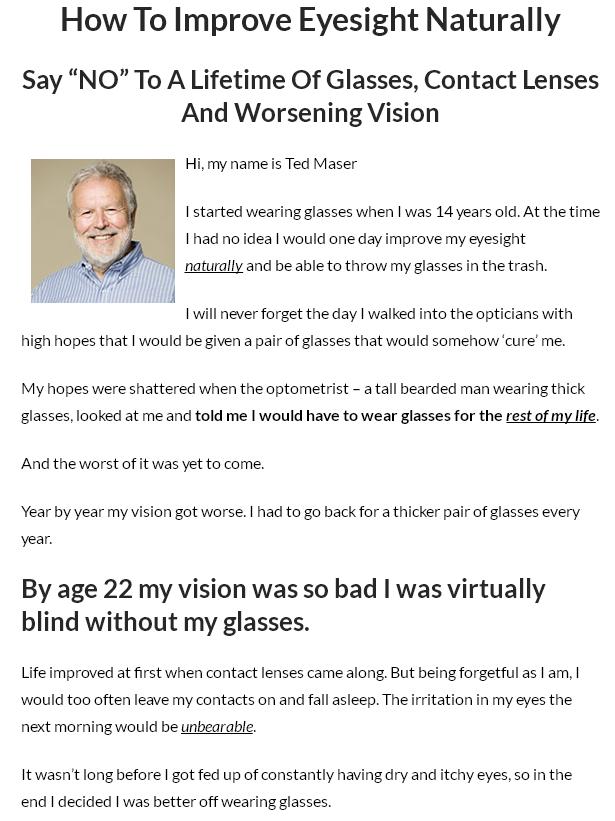
Learn more at http://curemydisorder.com/links/improve-eyesight-tedmaser-site